How to Install Isolator Switch?
Isolator switches, also known as disconnect switches or safety switches, play a crucial role in electrical systems by allowing for the safe isolation of specific circuits or appliances for maintenance, repair, or safety purposes. Installing an isolator switch is a task that requires careful consideration and proper execution to ensure the safety and efficiency of the electrical system. In this blog post, we will provide a step-by-step guide on how to install an isolator switch to help you complete this essential electrical project with confidence.
Materials and Tools
- Isolator Switch: Ensure you select an isolator switch suitable for your specific application, taking into account factors like electrical load and voltage requirements.
- Screwdriver: For securing the switch to the electrical box.
- Wire Strippers: Needed for removing insulation from wires.
- Electrical Wires: Depending on the situation, you may require new wires or cables, especially if existing ones are damaged or outdated.
- Electrical Box: If you are installing a new switch, you will need an electrical box to mount it securely.
Installation Steps
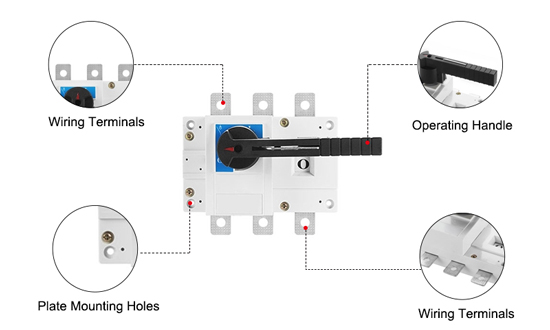
First, let’s take a look at its basic structure.
Step 1: Prioritize Safety
Safety is paramount when working with electrical systems. Here's a more detailed breakdown of safety measures:
- Turn Off Power Supply: Before you start, locate the main circuit breaker or fuse box and turn off the power supply to the circuit where you plan to install the isolator switch. This ensures that there is no electrical current running through the wires you'll be working with.
- Use a Voltage Tester: Even after turning off the power, use a voltage tester to double-check that the wires are indeed free of electrical current. Simply touch the tester to the exposed wire ends to ensure there is no voltage present.
Step 2: Plan and Mark the Location
- Select an Ideal Location: Carefully choose where you want to install the isolator switch. Consider factors like accessibility and proximity to the circuit or appliance you want to control. Make sure it is within the reach of the wires you'll be connecting.
- Mark the Location: Once you've chosen the location, use a pencil or marker to mark it on the wall or the electrical box. This mark will serve as your installation reference point.
Step 3: Prepare the Wires
- Identify the Wires: If you're connecting the isolator switch to an existing circuit, identify the wires that you want to control with the switch. These are typically the "hot" or "live" wires supplying power to the circuit or appliance.
- Cut the Wires: Measure and cut the wires to the required length, making sure there is enough slack to comfortably make connections to the switch.
Step 4: Mount the Electrical Box
- Select the Appropriate Box: If you're installing a new isolator switch, choose an electrical box that is suitable for the switch and securely attach it to the wall or surface at the marked location. This box provides a safe housing for the switch and wires.
- Securely Attach the Box: Use appropriate screws and anchors to ensure the electrical box is firmly attached to the surface.
Step 5: Connect the Wires
Now, let's break down the process of connecting the wires in more detail:
- Terminal Configuration: Isolator switches typically have three terminals: two incoming and one outgoing. The exact configuration can vary, but the following guidelines apply to most switches.
- Incoming Power: Connect the "hot" or "live" wire from the power source to one of the switch's incoming terminals. Ensure a secure connection by tightening the terminal screw.
- Outgoing Power: Connect the corresponding "hot" or "live" wire that leads to your appliance or circuit to the other incoming terminal. Again, ensure a tight connection.
- Connection to Appliance/Circuit: Lastly, connect the "hot" or "live" wire from the switch's outgoing terminal to the appliance or circuit that you want to control. Make sure this connection is secure as well.
Step 6: Grounding
Attach the grounding wire (typically green or bare) to the grounding terminal on the switch or the electrical box. This helps to protect against electrical faults and ensures safety.
Step 7: Secure the Switch
Use the screws provided with the switch to securely attach it to the electrical box. The switch should be fixed in place, with no wobbling or loose parts.
Step 8: Test the Switch
Before restoring power, conduct a detailed test of the switch:
- Double-Check Connections: Ensure all wire connections are tight and secure. Loose connections can lead to electrical hazards.
- Turn the Power Back On: Go back to the main circuit breaker or fuse box and switch the power supply back on to the circuit where the isolator switch is installed.
- Test the Switch: Operate the isolator switch to ensure it functions correctly. Verify that it can effectively disconnect the power supply to the appliance or circuit.
- Visual Inspection: Look for any signs of sparks, unusual sounds, or smoke. If you notice any problems, immediately turn off the power supply and address the issue before proceeding.
Step 9: Close Up
If the test is successful and the switch is working as intended, replace the electrical box cover and secure it in place. This cover provides protection and helps prevent accidental contact with live wires.
Step 10: Safety Labeling
As a final step, it's a good practice to label the isolator switch for clarity. Use labels or tags to indicate the purpose of the switch and what it controls. This is particularly important if there are multiple switches in the same area.
Installing an isolator switch is a crucial task for ensuring electrical safety and facilitating maintenance and repairs. By following these step-by-step instructions, you can install an isolator switch with confidence. Remember that electrical work can be hazardous, and compliance with local electrical codes and regulations is essential. If you are unsure about your abilities, it is advisable to consult a licensed electrician to perform the installation. If you need an isolation switch, please go to the ATO store to buy a high-quality isolation switch.
