How to Install a Gauss Meter?
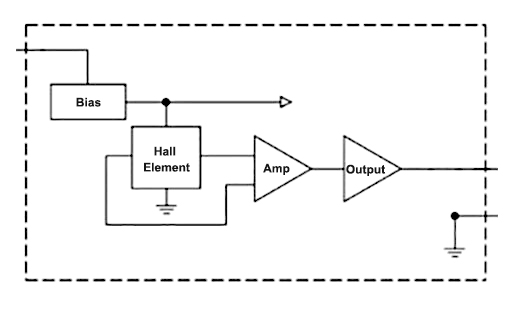
A millitesla meter (also known as a gauss meter) consists of a hall probe and a measuring instrument. The Hall probe generates a Hall voltage in the magnetic field due to the Hall effect, and the size of the magnetic induction can be determined after measuring the Hall voltage according to the Hall voltage formula and the known Hall coefficient. Gauss meter readings are given in units of gauss or kilogauss. Gauss meter is used to measure and display the average magnetic flux density per unit area or magnetic induction strength of precision instruments.
Principle
Gauss meters are based on the Hall effect principle of magnetic field measurement, using Hall sensors as the magnetic sensing element. Users may find the problem that using different types of probes will produce different measurements even at the same point. This is not a measurement error, but rather a result of the different sizes of the Hall sensors and positional errors in the assembly. It is particularly important to select the correct gauss meter and the corresponding Hall probe according to the different needs.
Preparation for Installation
First of all, you need to choose a suitable mounting location, depending on the use of the gauss meter and the environment. Make sure that you choose a location that is not subject to excessive magnetic field interference and that is convenient for operating and observing the gauss meter. Before installation, check that the gauss meter and its accessories are in good condition and that they have not been damaged during transportation.
Ensure that you have received all necessary accessories such as power adapters, cables, probes, etc. If the gauss meter requires a power supply, make sure the power supply is ready and compatible with the gauss meter. Check the battery charge or the voltage and current requirements of the power adapter. Prepare the necessary installation tools, such as screwdrivers, bolts, nuts, cable clamps, brackets, etc., depending on the type of gauss meter and mounting method.
Installation Method
The method of installing the gauss meter will vary depending on the specific model and application. The following general gauss meter installation procedure can be adapted to the gauss meter model and requirements.
- Installing the Probe: The probe of the gauss meter is the key component used to measure the magnetic field. The probe is properly mounted on the gauss meter according to the guidelines provided by the manufacturer. Normally, the probe is connected to the body of the gauss meter using a connecting wire.
- Mounting Bracket or Mount: If the gauss meter needs to be secured in a specific location, mount the bracket or mount. Ensure that the bracket or mount is secure and that the gauss meter is mounted firmly.
- Connecting the Power Supply: If the gauss meter requires a power supply, connect the power adapter or battery to the gauss meter. Ensure that the power supply is properly connected and that the voltage and current match the requirements of the gauss meter.
- Turn on the Gauss Meter: Turn on the gauss meter and follow the instructions provided by the manufacturer. Wait for the gauss meter to start up and be ready to take measurements.
- Row Initial Setup: Set the measurement range, units, calibration, and other parameters of the gauss meter according to your specific needs. This can usually be done through the gauss meter's control panel or menu.
- Position the Gauss Meter: Place the gauss meter in the chosen location, making sure that it is not subject to excessive external magnetic interference. The gauss meter should be positioned so that it can measure the magnetic field in the area you are interested in.
- Making Measurements: Ready to begin making magnetic field measurements with the gauss meter. Follow the guidelines provided by the manufacturer to place the probe at the location you want to measure and record or monitor the results.
Installation Precautions
There are some important precautions to keep in mind when installing the gauss meter to ensure accuracy and safety. Ensure that the gauss meter is not disturbed by external magnetic fields, which may result in inaccurate measurements. Choose a location away from magnetic materials, electromagnetic equipment, and other sources that may cause interference. The gauss meter requires periodic calibration to ensure accuracy. Follow the calibration intervals and procedures provided by the manufacturer.
Before installing and operating the gauss meter, read the user's manual carefully to understand the gauss meter's functions, operation, and maintenance requirements. The user manual contains important information and guidelines. Clean the gauss meter, especially the probe section, regularly to prevent the accumulation of dust and dirt that can affect measurement accuracy. Safe use of power: If the gauss meter requires a power supply, ensure that electrical safety rules are followed and wiring is done correctly to avoid electric shocks and other safety issues.
Use the Gauss Meter Methods
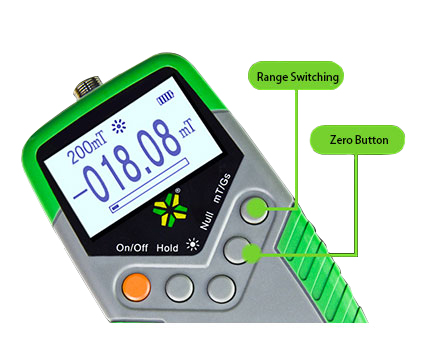
Connect the Hall head and gauss meter, then press the power button to turn on the power. Press the red button to select the corresponding range, the red button is the range, when pressed, it is 2000mT, otherwise, it is 200mT. use a screwdriver to adjust the "zero" on the back of the gauss meter, the unit of the magnetic field test is milli Tesla, and when it shows "-", the probe is pointed at the N-pole. When "-" is displayed, the probe is pointed at the N pole. Measurement with the Hall chip touching the magnet surface will give a result close to the actual value, while measurement with the substrate surface will give a low result.
Installing a gauss meter may require some preparation and careful steps, but these efforts will help ensure the accuracy and reliability of the gauss meter. Whether you are using a gauss meter in a scientific laboratory, engineering project, or other field, proper installation is a critical step in ensuring successful measurements. Following the manufacturer's guidelines, precautions, and safety rules can help users fully utilize the capabilities of their gauss meter and obtain reliable measurements. We hope that the gauss meter installation guide provided by ATO.com will help you to complete the installation of your gauss meter perfectly.
