How to Install a Float Switch?
The float switch is a commonly used water level controller, which controls the water level by the up and down movement of the float. The principle of the float switch is to utilize the principle of buoyancy, when the liquid level rises, the float will rise with it, when the float rises to a certain height, the switch will be triggered, to control the switch of the pump or the valve to achieve the purpose of controlling the water level. This article mainly introduces the installation and adjustment method of the float switch.
Installation Method of Float Switch
First of all, you need to choose a suitable installation location, in general, you should choose to install in the high water level of the water tank or pool, to ensure that the float switch can accurately control the water level. When installing, it should be noted that the float should be able to move freely without any obstruction, and it is also necessary to ensure that the wires of the float switch can be smoothly connected to the controller or power supply.
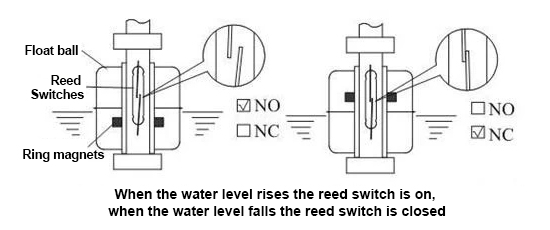
Float switch in the installation before the need to recalibrate the water level line, to ensure that the installation process and thermal equipment water level line maintain consistency, it should be noted that the high plus level and other switches work at a high temperature, so that the temperature of the water inside it is also high, high temperature water density should be less than the density of the room temperature water, so that the room temperature of the water action line than the switch marking line to be a little lower, the liquid level of low alarm is connected to a normally closed on the (NC), the liquid level high connected to a normally open (NO).
Using the magnetic float of the float switch with the liquid level rise and fall, the sensor detects the set position of the reed switch chip in the tube action, issued by the contact switch conversion signal. Generally, one or more reed switches are installed in a closed non-conductive magnetic tube, which is passed through one or more hollow floats with internal ring magnets. The rise or fall of the liquid drives the floats to move up and down together, so that the reed switches in the non-conductive magnetic tube will produce suction or disconnection action, thus realizing the role of outputting a switching signal.
How to Wire a Float Switch?
Float switches usually have three wiring ports, normally open, normally closed, and common. The wiring is black, blue, and brown wire, when supplying liquid, connect the black, and blue two lines, low liquid switch on, high liquid switch off. When discharging liquid, connect the black and brown wires, and switch on when high liquid and low liquid come tube disconnect. Normally open and normally closed are the states when the switch is operated, while the common wiring port is the port for float signal output.
If a float switch is required, each of the three wires from the float switch needs to be connected to the control. The normally open port needs to be connected to an input port in the control circuit of the downstream equipment or device. The normally closed port needs to be connected to a grounded power source. The common terminal port, on the other hand, needs to be connected to the output port of the control device to monitor the float position and trigger the appropriate operation. It is important to note that different models of float switches may have different pinouts and wiring methods, so it is important to read the equipment installation manual and follow the wiring instructions to ensure proper operation and avoid malfunctions.
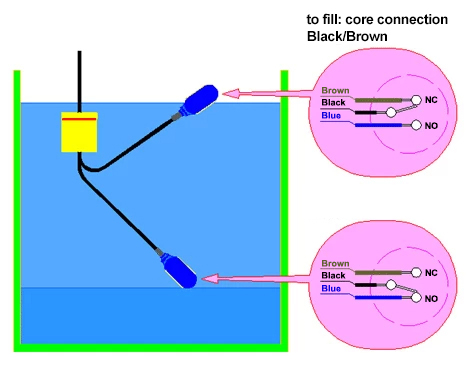
Float switches generally contain three wires, one common (COM), one normally closed (NC), and one normally open (NO). Among them, the common wire is the power wire of the float switch, and the normally closed and normally open wires are the output ports of the switch. When wiring, you need to first determine the control object, such as water level control or alcohol concentration control, etc., and then arrange the power and output port wires according to the requirements of the control object.
Generally, the common wire is connected to the negative pole, while the normally closed or normally open wire is connected to the input port of the controlled device. The electrical signal output from the normally closed line is the on-off state, and the signal output from the normally open line is the off-off state. In practice, the selection needs to be made according to the specific situation. When wiring, you need to pay attention to ensure the safety and reliability of the power and control lines, to avoid short circuits or disconnections between the power supply and the output port.
How to Adjust the Float Switch?

The adjustment method of the float switch is also very simple, first of all, you need to install the float switch to a suitable position, and then put the float into the water, adjust the position of the float so that it can accurately control the water level. Specifically, this can be done by adjusting the fixed position of the float or adjusting the sensitivity of the float switch. If a higher water level needs to be adjusted, the float can be moved upward, and if a lower water level needs to be adjusted, the float can be moved downward.
The height of the level control is determined by the length of the cable in the liquid and the position of the weight. The method of fixing the weight is to remove it from the non-flared section, slip it over the cable in its proper position, and then thread the cable through the flared end of the weight.
The float switch is a very practical water level controller, it can help us accurately control the water level to avoid the water level being too high or too low. When installing and adjusting the float switch, you need to pay attention to some details to ensure its normal operation. ATO.com can provide you with professional installation services, we have professional senior engineers at your service at any time, you can click on the consulting service at contact us if you encounter any difficulties in the process of using the float switch during installation.
