4-in-1 Multi-Gas Detector Setup Guide
Reliable gas detection is essential when working in environments where hazardous gases may be present. The ATO 4-in-1 multi-gas detector is designed to simultaneously monitor carbon monoxide (CO), oxygen (O2), hydrogen sulfide (H2S), and combustible gases (%LEL), helping users quickly identify dangerous atmospheric conditions and improve workplace safety.
This guide explains how to operate the gas detector, including powering on, accessing the menu, performing calibration, configuring alarm settings, managing data logging, exporting recorded data, switching measurement units, restoring factory settings, and viewing system information.

I. Getting Started
Before you can configure or calibrate the 4-in-1 multi-gas detector, you need to start the device and access its settings menu. Follow the steps below to power on the detector, complete the startup self-test, and enter the main menu using the default password.
1. Power On

To power on the 4-in-1 multi-gas detector, press and hold the middle key for about 3 seconds. The 4-in-1 multi-gas detector automatically performs a quick self-test, during which the indicator lights may flash and the buzzer may sound, depending on the model. Once the startup check is complete, the gas detector enters the real-time gas monitoring screen, displaying live readings for CO, O2, H2S, and combustible gases (%LEL).
2. Accessing the Menu

To enter the menu, press and hold the left key for 3 seconds. The 4-in-1 multi-gas detector will prompt you to enter the password. The default password is 1234.
- Press the right key to change the current digit.
- Press the left key to move between digits.
- Press the middle key to confirm and enter the main menu.
II. Configuration
Once you've powered on the detector and accessed the main menu, you can begin configuring the device for your application. This section covers the essential settings, including calibration, alarm configuration, monitor settings, and measurement unit selection. Proper configuration helps ensure accurate gas detection, reliable alarm performance, and a monitoring experience tailored to your working environment.
1. Calibration

Select Calibration from the main menu. The calibration menu contains three options:
- Fresh Air / Zero Calibrate
- Span Calibrate
- Calibration Interval
1) Fresh Air / Zero Calibrate
Zero Calibrate should always be performed in a clean, fresh-air environment to ensure accurate gas readings. To perform a zero calibrate:
- Select Fresh Air / Zero Calibrate.
- Choose the gas you want to calibrate, such as Carbon Monoxide (CO).
- Press the right key to begin calibration.
- Wait for the 4-in-1 multi-gas detector to complete the 30-second countdown.
- Press the middle key to return after calibration is complete.
Repeat the same procedure for the remaining gases whenever necessary.
2) Calibration Interval
The Calibration Interval setting allows users to define how frequently the 4-in-1 multi-gas detector should be calibrated. The default calibration interval is 180 days, although it can be adjusted to meet your maintenance schedule or application requirements.
2. Alarm Settings
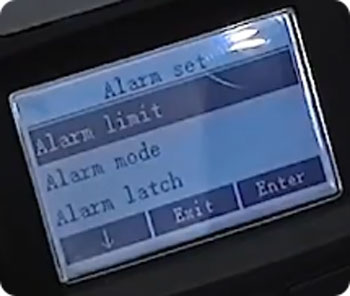
Return to the main menu and select Alarm, then enter Alarm Limit. Here you can configure alarm thresholds for each monitored gas individually, including:
- High Alarm
- Low Alarm
- STEL (Short-Term Exposure Limit)
- TWA (Time-Weighted Average)
1) Setting Alarm Limits
For example, to configure the Low Alarm for carbon monoxide:
- Press the right key to select CO.
- Use the left key to move between digits.
- Use the right key to adjust each value.
- Press the middle key to save the setting.
When "Succeed" appears on the display, the configuration has been saved successfully. Repeat the same procedure to configure the High Alarm, STEL, and TWA values.
2) Alarm Mode
The Alarm Mode menu allows you to enable or disable the available alarm methods, including the LED alarm, Buzzer, and Vibrator. If silent operation is required, simply disable the buzzer while leaving the visual and vibration alarms enabled if desired.
3) Alarm Latch
The Alarm Latch setting determines how alarms behave after gas concentrations return to safe levels. When enabled, the alarm remains active until it is manually acknowledged. When disabled, the alarm automatically clears once gas levels return to the normal range.
4) Man Down Alarm
The Man Down Alarm is designed to detect prolonged operator inactivity, which may indicate an emergency caused by hazardous gas exposure. Users can configure the no-movement time, motion sensitivity, and alarm duration to suit different working environments.
5) Comfort Beep
The Comfort Beep provides periodic audible confirmation that the gas detector is operating normally. Depending on the device model, users can enable or disable this feature and adjust the beep interval if the option is available.
3. Monitor Settings
Select Monitor from the main menu to access the 4-in-1 multi-gas detector's system settings. Within this menu, you can configure pump operation, measurement units, date and time, language, display settings, security options, self-test functions, and reset settings, allowing the detector to be customized for different applications, operating environments, and user preferences.
4. Switching Measurement Units
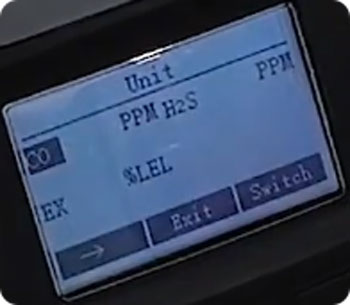
The gas detector allows users to switch between different measurement units for each gas. To change the display units, enter the Unit menu and press the right key to cycle through the available options, with each selection confirmed by a beep. Depending on the gas being monitored, the available units include PPM, μmol/mol, mg/m3, and %LEL for combustible gases. Once the desired units have been selected, press the middle key to save the settings and return to the detection screen, where the updated units will be displayed next to each gas reading.
III. Data Management
The ATO 4-in-1 multi-gas detector includes comprehensive data management features to help users track and maintain gas monitoring records. You can configure automatic data logging, manage stored records, and export measurement data to a computer for further analysis and documentation.
1. Data Logging

The ATO 4-in-1 multi-gas detector supports automatic data logging, allowing measurement records to be stored for future review. Within the Datalog menu, you can configure the logging interval, select the data types to record, view stored records, choose storage options, define how the detector behaves when the memory becomes full (such as overwriting old records or stopping logging), and clear all saved data when necessary.
2. Exporting Data
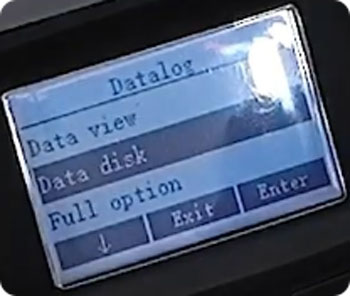
Recorded data can be exported directly to a computer for analysis and record keeping. To export data:
- Open Data Disk from the Datalog menu.
- Follow the on-screen prompt to connect the detector via USB.
- Place the 4-in-1 gas detector into its charging base.
- Connect the charging base to your computer using a USB cable.
- Open This PC, locate the newly recognized removable drive, open the SYSTEM folder, and then navigate to HISTORY_DATA.
Inside the HISTORY_DATA folder, you will find an Excel file containing detailed measurement records that can be reviewed, analyzed, or archived.
IV. System Settings
For maintenance and troubleshooting purposes, the 4-in-1 multi-gas detector provides options to restore factory settings and view detailed device information. These features help ensure the detector is properly configured, simplify diagnostics, and make it easier to verify system and calibration details.
1. Restoring Factory Settings
If necessary, the multi-gas detector can be restored to its factory default settings. To perform a factory reset:
- Open the Monitor menu and select Reset.
- Select Reset Sensor and wait for the 10-second countdown to finish.
- Next, select Reset Device and wait for the second 10-second countdown to complete.
- Return to the detection interface to verify that the detector has been restored to its default configuration.
If any zero-point drift is observed after the reset, perform a Fresh Air / Zero Calibrate in a clean-air environment before using the detector.
2. About
The About menu provides important device information, including the system version, user ID, manufacturing date, sensor information, and calibration records. This information can be used to verify the detector's configuration, review maintenance history, and assist with troubleshooting when required.
Conclusion
The ATO 4-in-1 multi-gas detector offers comprehensive monitoring of CO, O2, H2S, and combustible gases (%LEL), along with flexible configuration, calibration, alarm management, data logging, and USB data export functions.
By following the procedures outlined in this guide, users can correctly configure the gas detector, maintain measurement accuracy, and ensure reliable gas monitoring in industrial and hazardous working environments. If you need additional technical guidance, troubleshooting assistance, or product support, feel free to contact the ATO.com. Our technical team is ready to help you select, configure, and operate your gas detector.
