How to Install Rain Sensors?
As an environmental monitoring tool, a rain sensor primarily operates based on the detection of changes in electrical conductivity. When rainwater contacts the sensor surface, it alters its conductive path, causing a change in resistance or conductivity. This change is typically converted from an analog signal to a digital signal for electronic equipment to read and analyze. The accuracy of rain sensor data is highly dependent on proper installation. This article aims to provide a complete guide from site selection and installation to calibration to ensure your sensor performs optimally.
Installation Preparation
Preparing Necessary Tools and Materials
Before you begin installing a rain gauge sensor, make sure you have all the necessary tools and materials. Typically, you'll need the following: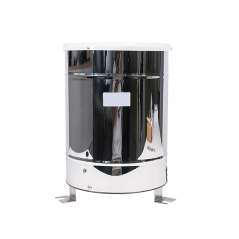
- Rain sensor device
- Mounting bracket or fixture
- Hand tools such as screwdrivers and pliers
- Electrical materials such as wires and connectors
- Power adapter or batteries (depending on the sensor model)
- Level
- Personal protective equipment (such as gloves)
Installation Environment Requirements and Considerations
The installation environment significantly impacts sensor performance, so several factors must be considered before installation. First, choose a location where rainwater is expected to directly impact the sensor while avoiding direct sunlight or other non-rainwater interference. Second, the ambient temperature at the installation location must remain within the sensor's normal operating range to prevent extremely high and low temperatures from affecting measurement accuracy. Furthermore, the installation site must be well protected from moisture and dust to ensure long-term stable operation and service life of the sensor. Finally, safety must be ensured during installation to avoid potential risks to personnel or property.
Installing a rain sensor also requires choosing an appropriate fixing method. Different types of rain sensors have different sensor designs and installation environments.. The sensor mounting method depends on the sensor design and installation environment. The following are some common mounting methods:
- Wall installation: Use screws to secure the bracket to a wall or pole, then secure the sensor to the bracket.
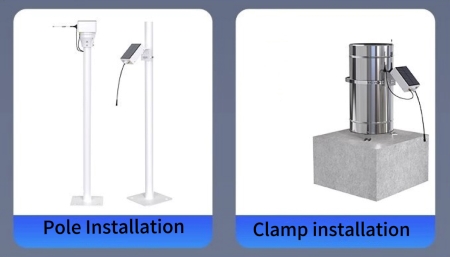
- Pole installation: Secure the sensor directly to the pole; suitable for outdoor environments.
- Clamp-on installation: Use a clamp to secure the rain sensor to the desired location; suitable for pipes or poles. Connecting the power and data cables is a critical step in the installation process and requires careful attention to ensure safety and stability. When connecting the power cable, ensure that the power adapter's voltage and current meet the sensor's requirements. If the sensor is battery-powered, ensure the battery is properly installed and fully charged. When connecting the data cable, ensure the connector is secure to avoid loose connections.
Installation Steps
Power Cable Connection
- Step 1: Confirm the sensor's power supply voltage requirements. Typically, the sensor's power supply voltage range is 5V to 24V. Before wiring, check the sensor's datasheet to confirm its voltage requirements.
- Step 2: Prepare the appropriate power cable, ensuring the cable specifications match the sensor's requirements. Use wire strippers to remove a small section of insulation from the cable ends.
- Step 3: Connect the positive and negative terminals of the power cable to the corresponding terminals on the sensor, according to the rain sensor's connector location. Ensure the connections are secure to prevent loose contact and unstable power supply.
- Step 4: After completing the connections, use a multimeter to test the power cable connection points to ensure there are no short circuits or open circuits.
Data Cable Connection
Data cable connection is crucial for enabling communication between sensors and controllers or other devices.
- Step 1: Select an appropriate data cable based on the sensor's communication protocol (e.g., analog, digital, I2C, SPI, etc.). For example, a two-core cable is typically used for sensors with analog output.
- Step 2: Connect one end of the data cable to the rain sensor's data output port and the other end to the corresponding input port on the controller.
- Step 3: Before connecting the data cable, ensure that the rain sensor is not powered on to avoid damage due to signal interference during the connection process.
- Step 4: After completing the connection, perform a simple communication test to verify that the data cable is connected correctly.
Configure Sensor Parameters
Most rain sensors come with configuration software, which allows you to set and optimize parameters.
- Step 1: Install the sensor's configuration software on your computer. During the installation process, ensure you follow the software's installation wizard instructions to complete the process.
- Step 2: Open the configuration software and connect the sensor to your computer via USB or serial port.
- Step 3: In the software, select the correct sensor model and follow the prompts to configure the parameters. Common configuration parameters include sensitivity, alarm threshold, and output mode.
- Step 4: After completing the configuration, save the settings and test the parameters in the software to ensure that the configuration is effective.
Choosing rain gauge sensors sold at the ATO online shop can provide convenient and quick installation methods. For example, tipping bucket rain gauges can be installed indoors or outdoors.
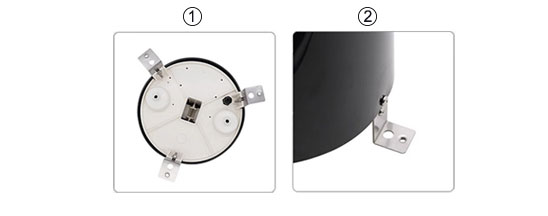
- For indoor installation: Remove the pearl cotton pad from the bottom of the rain sensor and install the support block onto the bottom of the instrument.
- For outdoor installation: Drill three Ø10 mounting holes with a depth of 8 to 10 cm in the concrete foundation. Insert the expansion bolts into the holes and tighten them with lock nuts. Then, install the rain sensor base onto the three support nuts. Adjust the height of the support nuts and use a spirit level to check that the rings are level. Finally, secure the top of the instrument with the lock nuts.
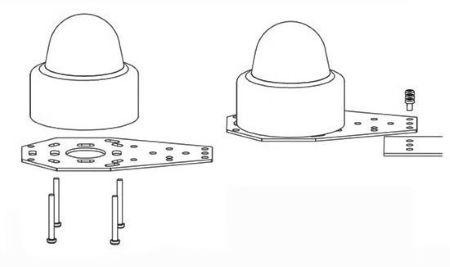
When installing an optical rain sensor, first install it in an open area, clear of any obstructions around or above it. Secondly, attach the optical rain sensor to the included bracket and secure the sensor to the bracket with four stainless steel screws and nuts. Then, install the bracket in the desired location (where five holes are required), horizontally positioning it, and secure the bracket and rain sensor with three stainless steel screws and nuts. If you are not using the bracket, you can customize your installation method based on the location and size of the copper studs.
In actual applications, sensor parameters often need to be adjusted and optimized based on the specific environment and usage requirements. First, adjust the sensitivity based on the results of field tests to avoid false alarms due to over-sensitivity. Second, optimize the alarm threshold based on actual rainfall conditions and application scenarios to improve detection accuracy and reliability. If the sensor supports multiple output modes (such as analog output, digital output, etc.), you should also test and select the output method that best suits the current application. Finally, record the optimized parameter settings and save the configuration in the software for subsequent calls and maintenance.
Calibrating Rain Sensors
After installation, a rain sensor needs to be calibrated. Calibration is a critical step in its use. First, regular zero-point calibration is crucial. In the absence of rainfall, check that the sensor's output is zero. If there is any deviation, adjust it. This prevents initial errors in the measurement data caused by the sensor's zero-point drift. Secondly, perform comparative calibration using a standard rain gauge. During rainfall, measurements are taken simultaneously with the standard rain gauge and the rain sensor to be calibrated. Based on the discrepancies between the two results, a specific calibration formula is applied or internal sensor parameters are adjusted to bring the rain sensor's measurements into line with those of the standard rain gauge. For example, in some meteorological calibration laboratories, technicians conduct rigorous comparative calibration tests on different rain sensor models in simulated rainfall environments to ensure that their accuracy meets industry standards.
Before calibrating a rain sensor, preparation is crucial. This not only affects calibration accuracy, but also the sensor's long-term stability and reliability. Sensor calibration should be performed in a stable environment to minimize the impact of factors such as humidity and temperature on the calibration results. Recommended environmental conditions are: Temperature range: 15°C - 30°C; Humidity range: 40% - 60% RH.
Calibration of a rain sensor requires selecting the appropriate tools based on the sensor type and specifications. For most rain sensors, the following tools are required:
- A standard rain simulator: Used to simulate rainfall of varying intensities.
- A calibration parameter setting tool: Included software or handheld configurator, etc..
- A test record sheet: Used to record key data during the calibration process.
Detailed Calibration Procedures
The calibration process should be performed according to established procedures to ensure accuracy and consistency. Sensitivity adjustment is the first step in the calibration process, used to determine the sensor's response threshold to raindrops. First, set the standard rain simulator to its minimum rainfall level and adjust the sensor's sensitivity to its maximum level using the configuration tool. Then, gradually increase the simulator's rainfall level until the sensor triggers for the first time, recording the rainfall level at that point. Finally, adjust the sensitivity parameters using the configuration tool to ensure the sensor triggers accurately under appropriate rainfall conditions.
The calibration results are then verified by using the simulator to set different rainfall levels and recording the sensor's trigger point. The sensor is then installed in a real-world application environment and observed to see its response under natural rainfall conditions. Finally, the simulated data is compared with the actual data to verify consistency in triggering behavior, ensuring measurement accuracy and reliability.
Post-Calibration Performance Evaluation
After calibration, a comprehensive sensor performance evaluation is required. Three performance testing methods are described below.
The first is a response time test, which simulates rainfall and records the sensor's response time. The second is to conduct stability and repeatability testing, simulating the same rainfall amount multiple times and recording the consistency of the sensor triggering. The third is an anti-interference test: This tests the sensor's stability in environments such as strong winds and high humidity.
To ensure the sensor maintains accuracy over time, the calibration of the rain sensor requires long-term monitoring. Recommended practices include: Periodically (e.g., quarterly) calibrating the sensor, recording the data from each calibration, and creating a performance profile. Compare this data over time to analyze trends in sensor performance.
In short, installing a rain gauge isn't just a matter of mechanical fixation; it's a delicate process that hinges on data accuracy, equipment reliability, and long-term operational stability. From careful site selection and standardized installation to meticulous calibration and optimization, every step is crucial. This article aims to help you effectively complete the installation, ensuring the sensor captures accurate and reliable precipitation data, providing a solid foundation for meteorological analysis, agricultural irrigation, and flood control decisions.
The completion of installation also marks the beginning of maintenance. It's recommended to regularly check the sensor's condition, clean the water reservoir, and re-verify its accuracy after extreme weather events. Only through proper initial installation and ongoing maintenance can a rain gauge maximize its value throughout its long lifespan.
