
How to Install a Battery Indicator: Step-by-Step Installation and Wiring Guide
Installing a battery indicator is a straightforward process when the correct mounting method and wiring configuration are used. Whether you are installing a battery indicator on a golf cart, motorcycle, RV, boat, solar battery system, or industrial equipment, proper installation helps ensure accurate battery level monitoring and reliable performance.
Battery indicators can be installed using embedded panel mounting, screw mounting, or surface mounting, depending on the application. While each installation method differs in mounting structure, the basic wiring principles remain the same. This guide explains how to install each type correctly and provides practical wiring tips for safe, accurate, and reliable battery monitoring.
- Battery Indicator Installation Overview
- How to Install an Embedded Panel Mount Battery Indicator?
- How to Install a Screw-Mounted Battery Indicator?
- How to Install a Surface-Mounted Battery Indicator?
- How to Wire a Battery Indicator?
- Battery Indicator Installation Best Practices
- Conclusion
I. Battery Indicator Installation Overview
| Installation Type | Typical Applications | Installation Method |
| Embedded Panel Mount | Golf carts, RVs, industrial control panels | Panel cut-out with rear mounting bracket |
| Screw-Mounted | Motorcycles, electric vehicles, dashboards | Fixed with mounting screws |
| Surface-Mounted | Boats, battery boxes, solar systems | Mounted directly on a flat surface |
II. How to Install an Embedded Panel Mount Battery Indicator?
Embedded panel mount battery indicators are designed to fit neatly into dashboards, control panels, electrical cabinets, and equipment panels. Once installed, only the front display remains visible, providing a clean appearance while protecting the wiring and mounting hardware inside the panel.
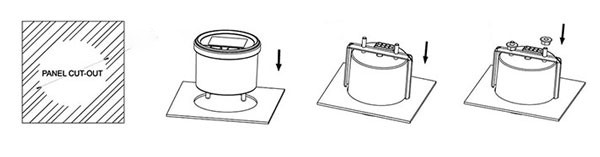
Step 1: Prepare the Panel Cut-Out
Cut the mounting hole according to the dimensions specified for your battery indicator. The opening should match the required diameter or panel cut-out size to ensure a secure fit. Remove any burrs or sharp edges before installation.
Step 2: Insert the Battery Indicator
Insert the battery indicator from the front of the panel until the front bezel sits flush against the mounting surface. Make sure the display is correctly oriented before proceeding to the next step.
Step 3: Secure the Indicator
Install the supplied mounting bracket or retaining nuts from the rear of the panel. Tighten them evenly to hold the battery indicator firmly in place without overtightening, which may damage the housing.
Step 4: Connect the Wiring
Connect the power and signal wires according to the wiring diagram provided with the battery indicator. Double-check the battery voltage, terminal polarity, and wiring connections before powering on the system.
Step 5: Test the Battery Indicator
Turn on the battery system and verify that the display powers up normally. Confirm that the battery level, voltage reading, and any additional functions such as alarms or backlighting operate correctly.
Installation Tip: Before drilling or cutting the panel, verify the required mounting dimensions and ensure there is sufficient clearance behind the panel for wiring and the mounting bracket.
III. How to Install a Screw-Mounted Battery Indicator?
Screw-mounted battery indicators are widely used on motorcycles, golf carts, electric vehicles, forklifts, and industrial equipment where a sturdy surface-mounted installation is required. Compared with embedded panel mount models, they are secured directly to the mounting surface using screws, making installation quicker and requiring less panel preparation.
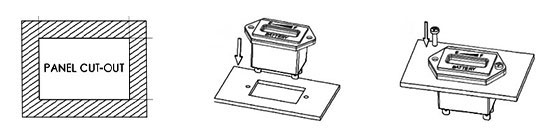
Step 1: Prepare the Mounting Position
Choose a flat and stable mounting surface with good visibility during operation. Mark the mounting location and prepare the required mounting holes according to the product dimensions.
Step 2: Position the Battery Indicator
Place the battery indicator in the desired position and align the mounting holes with the prepared screw holes. Check that the display is level and easy to read before securing it.
Step 3: Secure the Indicator
Insert the mounting screws and tighten them evenly until the battery indicator is firmly attached to the mounting surface. Avoid overtightening, which may damage the housing or mounting bracket.
Step 4: Connect the Wiring
Connect the battery indicator according to the wiring diagram supplied with the product. Before applying power, verify the battery voltage, wiring polarity, and all terminal connections.
Step 5: Test the Battery Indicator
Power on the battery system and confirm that the display starts normally. Verify that the battery level, voltage reading, and any additional functions operate as expected.
Installation Tip: If the battery indicator is installed on a motorcycle or other equipment exposed to vibration, use locking washers or thread-locking adhesive to help prevent the mounting screws from loosening over time.
IV. How to Install a Surface-Mounted Battery Indicator?
Surface-mounted battery indicators are designed for quick installation without requiring a panel cut-out. They are commonly used on battery boxes, RVs, boats, golf carts, forklifts, and off-grid solar battery systems where drilling a large mounting hole is impractical. Since the entire housing is mounted externally, installation is straightforward while still providing easy access for maintenance and wiring.
Step 1: Select the Mounting Location
Choose a clean, flat, and dry mounting surface that provides good visibility during normal operation. Make sure there is sufficient space around the battery indicator for wiring and future maintenance.
Step 2: Mount the Battery Indicator
Position the battery indicator on the mounting surface and align the mounting holes. Secure it using the supplied screws or other recommended mounting hardware until the housing is firmly attached without excessive force.
Step 3: Connect the Wiring
Connect the battery indicator according to the supplied wiring diagram. Before applying power, verify that the battery voltage, wiring polarity, and terminal connections are correct.
Step 4: Secure the Wiring
Route the cables neatly and fasten them with cable clips or cable ties. Keep the wiring away from sharp edges, moving parts, and heat sources to reduce the risk of damage caused by vibration or environmental exposure.
Step 5: Test the Battery Indicator
Turn on the battery system and verify that the battery indicator powers up normally. Check that the battery level, voltage reading, and any additional functions operate correctly.
Installation Tip: If the battery indicator is installed outdoors or in a damp environment, use waterproof connectors or seal the cable entry points to help prevent moisture from affecting the electrical connections.
V. How to Wire a Battery Indicator?
Battery indicator wiring varies depending on the product model and available functions. Always disconnect battery power before wiring and follow the manufacturer's wiring diagram. The most common wiring configurations include:
| Wiring Configuration | Function |
| Two-Wire Wiring | Connects directly to the battery positive (+) and negative (-) terminals. |
| Key Switch Wiring | Allows the indicator to power on only when the ignition or key switch is activated. |
| Multi-Terminal Wiring | Supports relay outputs, alarms, voltage selection, and additional control functions. |
| Multi-Voltage Wiring | Supports multiple battery voltages such as 12V, 24V, 36V, and 48V. |
VI. Battery Indicator Installation Best Practices
Following these installation recommendations helps improve accuracy and extend the service life of the battery indicator.
- Disconnect battery power before installation.
- Confirm the battery voltage matches the indicator rating.
- Verify positive (+) and negative (-) terminal polarity before wiring.
- Protect cables from moisture, vibration, and excessive heat.
- Route wiring away from moving components and sharp edges.
- Secure all electrical connections to prevent loose contacts.
- Test the battery indicator after installation to confirm normal operation.
VII. Conclusion
Proper installation is the key to obtaining accurate battery level and voltage readings from a battery indicator. Whether using an embedded panel mount, screw-mounted, or surface-mounted battery indicator, correct mounting and wiring help ensure reliable operation and long-term performance.
By following this step-by-step installation guide and the recommended wiring practices, users can reduce installation errors, improve measurement accuracy, and extend the service life of the battery indicator. ATO.com offers a wide range of battery indicators for 12V, 24V, 36V, and 48V battery systems, along with detailed installation instructions and technical support to help users achieve safe and reliable battery monitoring.
